Chapter 7 Walkthrough Page 5 - Archives Break-In
Complete Set Of Walkthroughs For Still Life
Getting the Robot past the Lasers
This puzzle can be a really annoying challenge. You might want to watch our Still Life Chapter 7 Video Walkthroughs so that you can see exactly how to get it done.
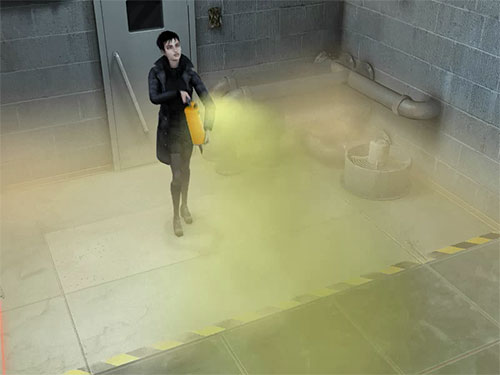
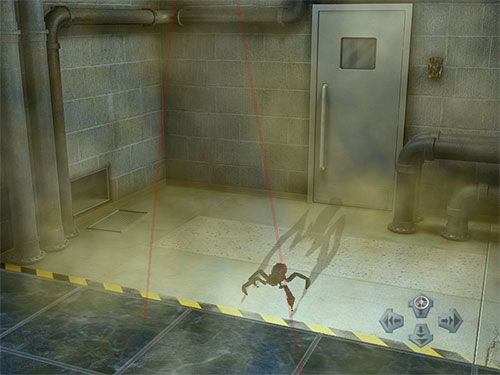
After the door to the Archives Security Corridor is open, you'll need to have Victoria enter the corridor and use the Fire Extinguisher. This will make the lasers visible. Once they are visible, you will need to return to the Robot Control Console and get another Robot.
Be aware that it is not always obvious where the lasers are located, so you'll need to watch very closely. And when you are on a safe tile, don't be afraid to wait and study the laser pattern. This will help you get through without too much trouble. Also note that you should have the Robot enter a tile just as the laser passes the center of the tile.
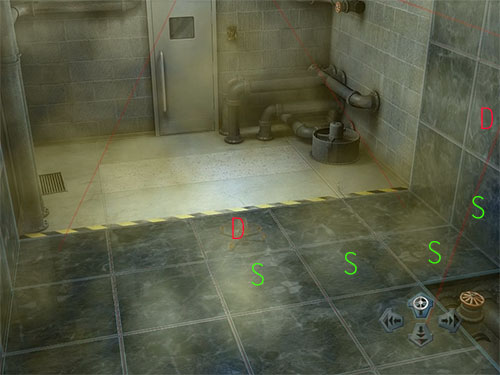
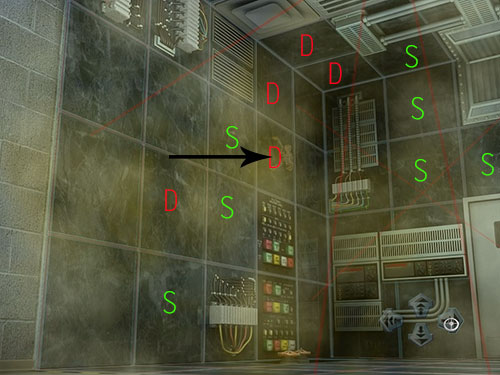
When you first enter the laser field you'll want to go in from the center as shown in the screenshot. Be warned, you'll need to wait until the two lasers have cleared the center of the tile. Also be aware that the screen orientation and view area will change as soon as the Robot moves. You must not let that distract you as the tile is NOT safe. As soon as you can, you'll need to move one tile further in onto the tile marked S as shown in the screenshot.
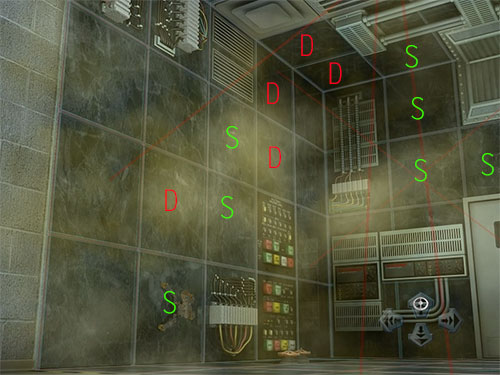
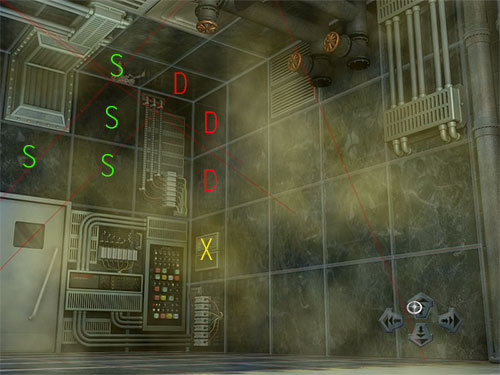
Note: In the screenshots for the laser field a Green S means the tile is Safe, a Red D means Danger!
Once you are on the safe tile, continue moving right until you reach the last floor tile, then continue one tile up the wall. Please note the next tile after this is a Danger Tile. Also note, the screen orientation and position will change again once you are on the safe tile on the wall.
The first tile in the laser field is a danger tile. You need to move onto it as soon as the lasers pass, and then immediately continue straight onto the next tile.
Now move the robot 2 tiles to the right and up one onto the wall.
The second tile up the wall is dangerous. Wait until the laser passes the center of the square, the move up into the square. Immediately turn right and move into the next square. This square, and the above it are safe.
Now read this next part carefully before you proceed. The next two moves are actually the trickiest. You'll have to move into the square immediately to the right when the laser passes the center of the square, then turn to face up. But, you actually have to wait until the laser passes the center of the square above you before you can enter it. As soon as it does, move up and don't stop until you reach the next safe zone.
This safe zone goes right around the wall as shown in the screenshots. You want to move to the last safe square. Then, once again, wait for the laser to pass the center of the square. As soon as it does, move into the square and keep on going. The X, as shown in the screenshot, is the square you want to head for. You'll actually stop in the danger square right before it. Don't worry, as long as the laser doesn't get you as you enter the square, the little Robot will fire its laser and destroy the control panel marked with a yellow X. That will shut down all the lasers and end this challenge.
With the lasers destroyed, Victoria can now proceed safely into the corridor and on into the archives computer room. When she reaches the room, just use the computer to have her automatically search for the information she needs.
You won't actually find anything except for a reference to a file checked out by Gus. Once you are done with the computer, Todd will come in and the two of them will get into quite an argument.
Head back to Pat's House after the argument with Browning. If Gus kept that file, it is hidden somewhere in the house.
When you arrive at Pat's House you'll need to head upstairs to the Study at the end of the hall. Above the Desk you'll see a painting hanging on the wall. Take a closer look at the painting and don't forget to rotate it. It's actually easy to find a bulge in the back of that painting, though sometimes the click zones can get a bit interesting.
As soon as Victoria comments on the bulge at the back of the painting you should head downstairs to the Jacuzzi Room. If you are unsure where that is, it is the door on the left wall when you are standing in the living room. This is another item that can be a bit difficult to spot but the Exacto is pretty much between Victoria's feet when you are standing in the Jacuzzi Room. Just mouse around until your mouse pointer changes.
Once you have the Exacto head back upstairs to the Study. Again click on the painting on the wall above the desk. This time you'll get a close-up of the painting as it hangs on the wall. Use the Exacto on the painting and Victoria will cut the painting open and retrieve the documents. A short cutscene will also be triggered.
Claire will call Victoria after the cutscene ends. Apparently Vaclav called the office in a panic about his neighbour. That will be Victoria's next destination, the Campus.

